Sunday, 22 May 2016

Carbon Fibre Back Panel

I really liked the look of Chris Forster's Carbon boot lid and have had it on my todo list for a long time. I finally got around to ordering a sheet of 0.7mm wet lay carbon, the size is 1200mm x 1000mm, so there was plenty to make a new back panel and boot lid to replace the plastic faux carbon ones that came from MNR.

The sheet came from Fibre-Lyte and was 650gm 2x2 single ply and 0.7mm thick, if I had of bought 400gm this would have been less than 0.5mm.

I used my original parts as a template and cut with scissors and a sharp Stanley knife. Fitted in place with some new Velcro. Will cut out the boot lid next.


24v Starter Circuit Part 2

Decided to move the battery from the passenger footwell to underneath the scuttle. I managed to find a smaller battery which is the standard fit for a Hayabusa. Made a simple battery box form aluminium sheet and tiger sealed together. 

I then fitted a second battery isolator and connected the cable to the starter motor that was previously on the starter solenoid. This will offer a method of isolation, then the other side of the isolator to the new battery and the other battery lead to the starter solenoid.  

I added a separate connection to the battery to allow charging from the trickle charger.


Thursday, 9 July 2015

24v Starter Circuit

The Brise starter works fine while the battery is fully charged, however when the battery drops to around 12 volts the cranking speed drops and makes the engine difficult to start. 

After talking to Rich at RLM he suggested changing to a 24v starter circuit and wiring in an additional battery. The new battery is wired in series after the output from the start solenoid before the starter motor. As I had a spare battery I decided to give it a go and mounted the battery in the passenger footwell. 

The engine now cranks faster than ever and starts a lot more consistently. I am currently still using the Brise starter but I may swap back to the standard hayabusa starter at a later date.


Brake Upgrade

With the extra power I decided to upgrade the brakes. I have not really been happy with the brakes since I built the car.

MNR now provide light weight discs and billet bearing carriers. I decided to upgrade to these and also fit a pair of rear wildwood calipers for the rear to replace the Sierra items. As these catch on my 13 inch Compomotives there is an added bonus with the wildwood's that they wouldn't catch.

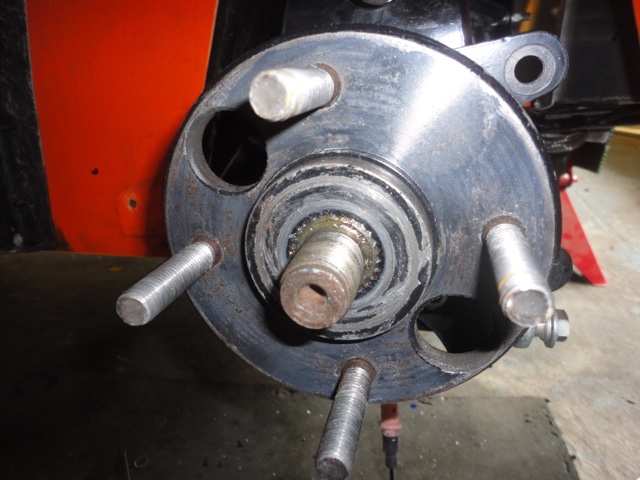
The only downside was that I needed the rear hubs machined to fit the new discs, I sent them to MNR to get this done, Marc machined them down to size within a couple of days. 

The kit was a straight swap and fitted well, when fitting the new bearing carriers I took the opportunity to fit new rear bearings. 

I took time to bleed the brakes, after I bled the rear calipers from the bottom and then from the top, the brake pedal became extremely solid with good feel. I think that the rear calipers may have been a problem all along.


Rear LED Lights

With the old clear Perei lights I had a couple of occasions that the driver behind couldn't see me braking. This is something that I have been thinking about for a while and thinking of an LED upgrade.

I managed to find some LED rear lights that fit the existing back boxes. Ideally I would have liked them to be clear but I couldn't find any, that were the same size. 

I swapped the lights and fitted a new electronic flasher relay, I'm really quite pleased with the results, the lights are now a lot brighter. 


Turbo Plenum Straps

Made up some straps from strips of aluminium, used the engine mounts and plenum fixings to hold in place.


Sunday, 21 June 2015

Turbo Mapping at RLM Racing

Took my car to RLM Racing to be mapped, all in all the car was on the dyno for a couple of days and I am really happy with the results. 

I asked Rich to map the car so that it would be drivable and to have a progressive power curve. Looking at the dyno plots he achieved this quite nicely. 

The MBE 9A9 ecu was set up to have switchable maps for different levels of boost. Low boost at 0.6 Bar, medium at 1 Bar and high at 1.3 Bar. This equates to around 250 / 310 / 400 wheel Hp. I have the option to cap the boost in the lower gears and then to fit front wheel sensor for traction control. I will try capping the boost in 1st and 2nd gears for the time being.

The GT28/76 turbo was the limiting factor and would not achieve more than 1.4 Bar and then tailing off to 1.3 Bar. With a larger turbo the engine is capable of making more power but may cause turbo  lag. For now 400 wheel hp will be plenty. 

On higher boost the plenum blew off so I will need to makeup some straps to keep it I place, Rich wired it down temporarily.

The charge cooler performed well and managed to keep inlet temperatures at a reasonable level, looking forward to see how it performs on the road and track.

Next step is to upgrade the brakes and wait for the weather to get better.